

🌠 I Love Hoshimachi Suisei!! 🌠
🌠 I Love Hoshimachi Suisei!! 🌠
Mastering Linux for Cybersecurity: From Beginner to Pro
Mastering Linux for Cybersecurity: From Beginner to Pro
Halloo, it’s me SuiiKawaii again — today we’re going to talk about Linux! Yes, that penguin OS you’re thinking of. To be honest, Linux is the backbone of modern cybersecurity and ethical hacking. Whether you are a beginner aspiring to work in IT security or an enthusiast exploring ethical hacking, mastering Linux is an essential step in your journey. This guide is designed to take you from zero to confident — from understanding what Linux is, to using it for security tasks, scripting, customization, and beyond.

Table of Contents
- 1. What is Linux?
- 2. Why use Linux for cybersecurity
- 3. How to choose a Linux distro (beginners)
- 4. Installing your distro
- 5. First things to do after install
- 6. How to learn Linux effectively
- 7. Practice with CTF: OverTheWire
- 8. Learn Bash for automation
- 9. Ricing: customize your Linux
- 10. Conclusion
1. What is Linux?
At its core, Linux is an open-source operating system kernel created by Linus Torvalds in 1991. The term “Linux” often refers to complete operating system distributions (distros) built around this kernel, combined with GNU utilities, software packages, and desktop environments.
Linux stands out because:
- It is free and open-source — anyone can view, modify, and distribute its source code.
- It offers unmatched flexibility — from tiny embedded systems to massive server clusters.
- It has a vibrant community — users and developers worldwide contribute to improvements.
Linux is widely used in servers, supercomputers, Android devices, IoT devices, and — most importantly for us — in cybersecurity.
Further references:
2. Why use Linux for cybersecurity
Cybersecurity work demands tools, customization, and control that Linux provides out of the box. Here’s why it’s the go-to choice for ethical hackers, penetration testers, and security researchers:
-
Pre-installed security tools
Many security-focused Linux distributions (like Kali Linux or Parrot OS) come with hundreds of tools for penetration testing, digital forensics, reverse engineering, and network analysis. -
Command-line power
The Linux terminal gives you low-level control and fast access to system internals. Many security exploits, scans, and scripts run best from a terminal. -
Stability and security
Linux is known for its robust permission model, strong process isolation, and fewer default services running compared to Windows — reducing the attack surface. -
Customization for task-specific environments
In cybersecurity, you may need a tailored OS setup for red teaming, malware analysis, or incident response. Linux makes that possible. -
Ubiquity in servers
Most web servers run Linux. To secure them, you must understand their inner workings.
3. How to choose a Linux distro (beginners)
For a beginner, choosing a Linux distribution can feel overwhelming. In reality, any distro can be used for cybersecurity, but some are better for starting out.
Beginner-friendly distros:
- Linux Mint — clean interface, easy to use for Windows switchers.
- Ubuntu — huge community, lots of tutorials, stable.
- Pop!_OS — great for productivity and development.
Security-focused distros:
- Kali Linux — industry-standard penetration testing OS with hundreds of tools pre-installed.
- Parrot Security OS — lightweight, privacy-focused, includes pen-testing tools.
- BlackArch — Arch-based, massive repository of security tools (best for advanced users).
Recommendation:
If you’re learning cybersecurity, start with Kali Linux or Parrot Security OS. These distros save you hours of setup by preloading tools you will need in CTFs, penetration tests, and labs. Once you’re comfortable, you can migrate to any distro — because at the end of the day, Linux is Linux.
Further references:
4. Installing your distro
a) Install as a virtual machine
- Tools: VirtualBox, VMware Workstation Player.
- Pros: Safe, runs alongside your main OS, easy to reset.
- Cons: Limited performance for heavy tasks.
b) Dual boot
- Partition your hard drive to run Linux and Windows side by side.
- Pros: Full hardware performance.
- Cons: Risk of data loss if not done carefully.
c) Live USB
- Boot Linux from a USB stick without installing.
- Pros: Portable.
- Cons: Changes may not persist unless configured.
If you’re new and worried about breaking things, start in a VM and take a snapshot before major changes.
Further references:
- How to Dual Boot Kali Linux and Windows (in 10 minutes)
- Kali Linux USB Live Boot with Persistence (in 5 minutes)
- ParrotOS Latest — Download and Installation — Step by Step
- Parrot OS Security Dual Boot with Windows 10/11 — Step by Step
- Step-by-Step Guide: How to Install BlackArch Linux for Ethical Hackers
5. First things to do after install
After installing Linux, there are essential configurations and habits to set up:
- Update your system
sudo apt update && sudo apt upgrade -y -
Learn basic navigation Commands like
ls,cd,pwd,cat,nanoare your building blocks. -
Familiarize yourself with package management
- Debian/Ubuntu-based:
apt install package-name - Arch-based:
pacman -S package-name
- Debian/Ubuntu-based:
-
Create a safe workspace Organize directories for scripts, projects, and notes.
- Understand user permissions
Learn
chmod,chown, andsudo.
Further references:
6. How to learn Linux effectively
Rather than memorizing hundreds of commands, focus on understanding how Linux works. Treat the terminal like a language: small daily reps beat weekend marathons.
Tips for learning:
- Use
manpages:man lsexplains thelscommand. - Practice daily — replace GUI actions with terminal commands.
- Break and fix things — troubleshooting is the best teacher.
Further references:
- Linux Journey — Free Linux Learning Path
- Linux Commands for Beginners (YouTube Playlist)
- Linux for Hackers — NetworkChuck (YouTube Playlist)
7. Practice with CTF: OverTheWire
Learning Linux commands in isolation is fine, but using them in challenges makes skills stick. One of the best free resources for beginners is OverTheWire.
OverTheWire: Bandit
- A gamified Linux learning experience.
- Starts with logging in via SSH and progresses to more advanced file searching, decoding, and scripting.
- Perfect for building the hacker mindset.
📌 You can check my complete OverTheWire Bandit walkthrough index here.
8. Learn Bash for automation
Once you’re comfortable with commands, the next step is to automate repetitive tasks. Start with tasks you repeat weekly; if you do it twice, script it.
Why Bash?
- Native to Linux.
- Can chain commands into powerful scripts.
- Useful for recon automation, log analysis, and data parsing.
Example:
#!/bin/bash
for ip in $(cat ips.txt); do
  ping -c 1 "$ip" | grep "bytes from"
done
Further references:
9. Ricing: customize your Linux
“Ricing” refers to deeply customizing your Linux environment — themes, icons, window managers, terminal looks — to make it uniquely yours.
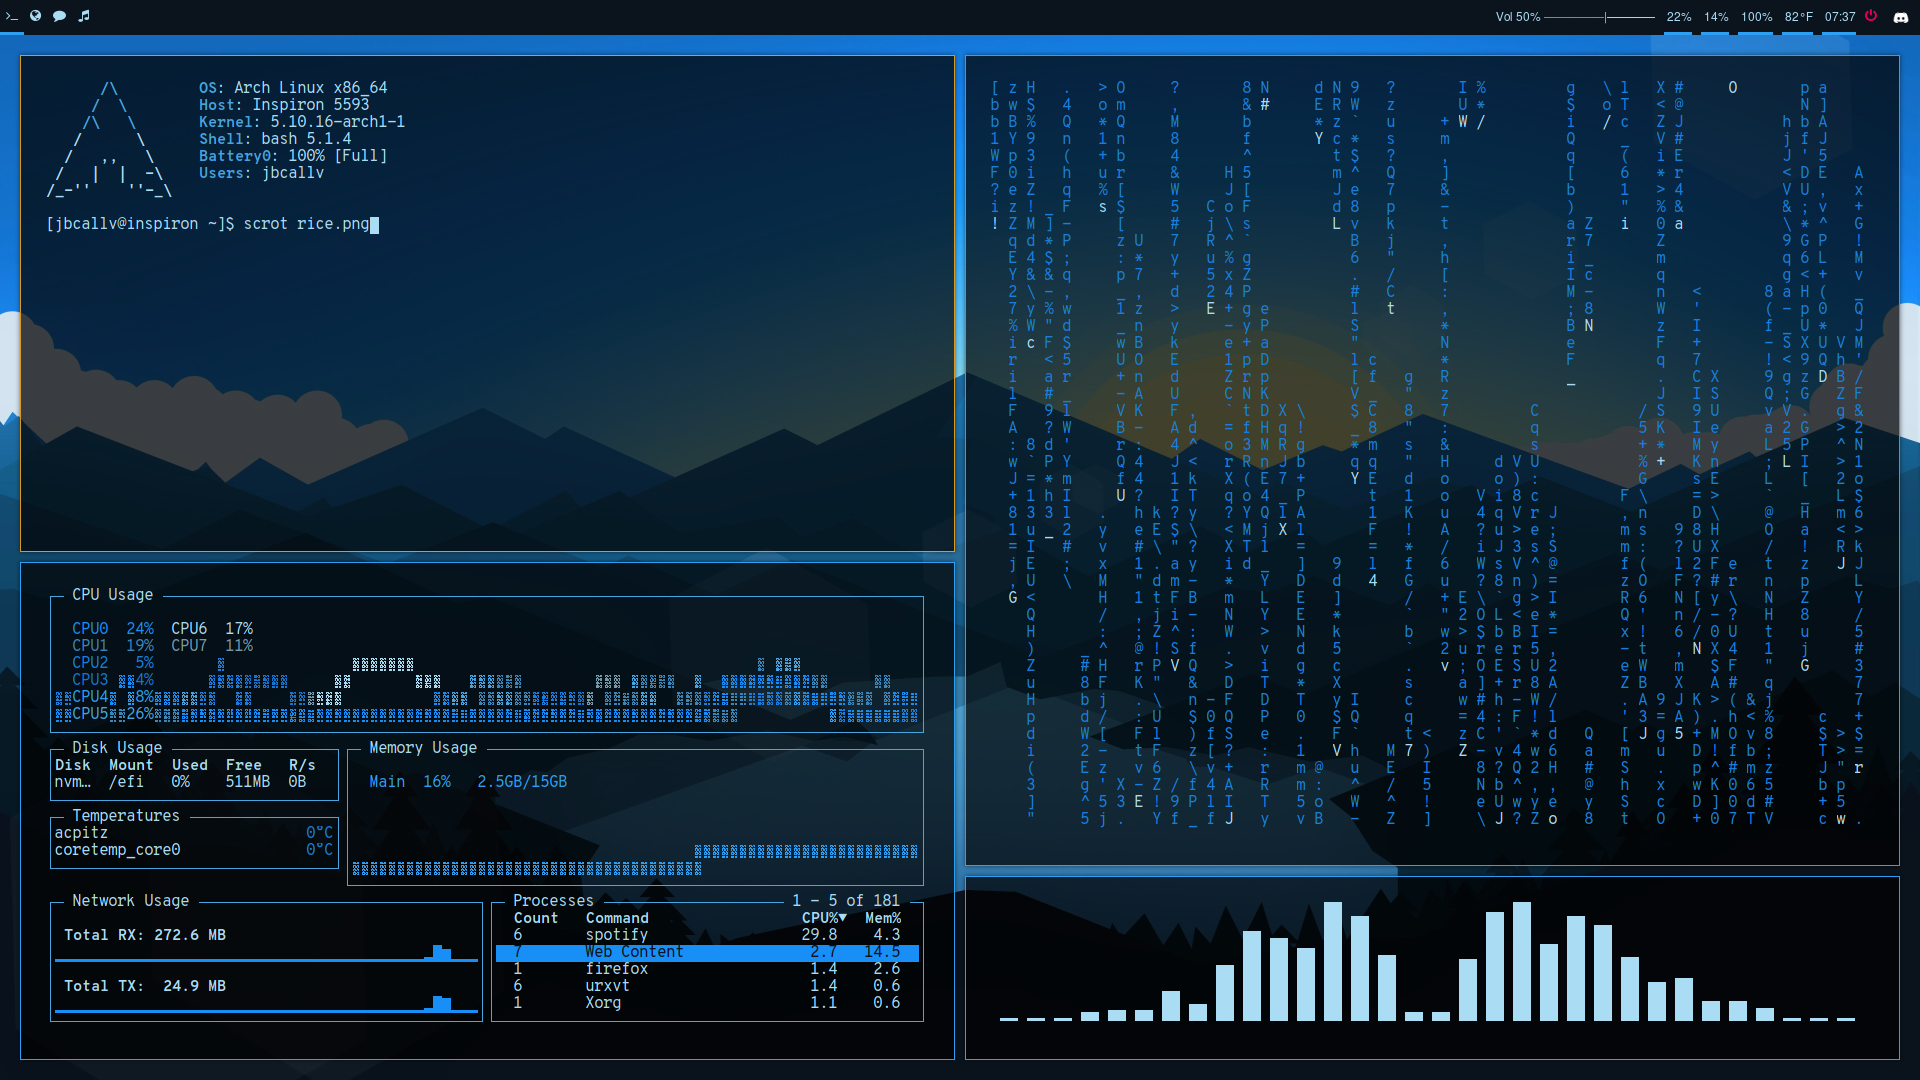
Why bother?
- Aesthetics: a pleasing environment motivates longer study/work sessions.
- Efficiency: custom keybindings and layouts can speed up workflow.
- Identity: your desktop becomes an extension of your style.
Popular setups:
- Desktop environments: GNOME, KDE.
- Tiling window managers: i3, Hyprland, bspwm.
- Theming: GNOME-Look (themes/icon packs), KDE Store.
- Terminal customization: Neofetch, custom prompts (e.g., Starship), color schemes.
Further references:
- 5 STAGES of ARCH Ricing (YouTube)
- Beginners guide to Ricing! (Linux Customization) (YouTube)
- How to Rice Hyprland | Full Guide (YouTube)
Communities:
10. Conclusion
Mastering Linux is not about memorizing every command — it’s about understanding the ecosystem, thinking like a problem-solver, and continuously experimenting. In short, the best way to learn it is to simply use it. If you spend enough time with it, you’ll quickly get comfortable and learn to master it.

Your roadmap:
- Understand Linux basics and why it matters in security.
- Choose a beginner-friendly yet security-ready distro.
- Install it in a safe environment.
- Learn core commands and permissions.
- Practice through daily use and CTFs.
- Automate tasks with Bash.
- Customize your setup for both looks and productivity.
By combining consistent practice with the right resources, you’ll transition from a beginner to a confident Linux power user, ready to tackle cybersecurity challenges head-on.
Appendix A — Quickstart checklist
Goal: get productive on Linux for security in one sitting.
Hardware & install
- Decide your path: VM (VirtualBox/VMware) first, dual boot later if needed.
- Allocate VM: 2–4 CPU cores, 4–8 GB RAM, 40+ GB disk, enable virtualization in BIOS.
- Download ISO: Kali/Parrot (security) or Ubuntu/Mint (daily driver).
First 60 minutes
- Update packages (APT/DNF/Pacman depending on distro).
- Install a code editor (VS Code, Neovim) and a modern terminal (Kitty/Alacritty).
- Create a
~/labfolder with subfolders:notes,scripts,loot,logs. - Set your shell prompt readable (timestamps, git branch).
- Take your first snapshot (VM) called
clean-base.
Daily routine
- 20 minutes CLI practice (navigation, search, permissions).
- 20 minutes on a Bandit level or similar lab.
- 10 minutes writing a journal: commands learned, gotchas, next goal.
Appendix B — FAQ
Should I daily-drive Kali/Parrot? Not at first. Use Kali/Parrot in a VM for tools; daily-drive Ubuntu/Mint for stability. Later, choose any distro you like.
Do I have to memorize commands? No. Understand what each tool does and practice. Repetition builds muscle memory.
Is a tiling window manager necessary? No. It’s a productivity preference. Start with GNOME/KDE, move to i3/Hyprland when you know your workflow.
How do I stay safe legally/ethically? Only test systems you own or have explicit written permission to test. Keep logs of your activities.
Appendix C — Glossary
Kernel — the core of the OS managing hardware and processes.
Distro — a complete OS built on the Linux kernel (Ubuntu, Kali, Parrot…).
Package manager — tool to install/update software (APT, DNF, Pacman).
Shell — interface to run commands (bash, zsh, fish).
Permission model (rwx) — controls who can read/write/execute files.
Pipe (|) — sends output of one command to another.
Redirection (>, >>, 2>) — saves output to files or redirects errors.
TTY/PTY — terminal interfaces for user input/output.
Cron/systemd timer — schedule tasks (scripts, maintenance).
VM snapshot — a point-in-time save of a virtual machine’s state.
Appendix D — Common errors & fixes
“Permission denied” running a script
- Make it executable:
chmod +x script.sh - Or call explicitly with interpreter:
bash script.sh
“Command not found”
- Ensure the package is installed (e.g.,
sudo apt install <tool>). - Verify PATH or call with absolute path.
APT/DNF/Pacman lock or broken packages
- Close other package managers; retry
sudo apt --fix-broken install. - For Pacman:
sudo pacman -Syuthen reinstall the package.
Network tools need root
- Use
sudowhere required (tcpdump, nmap raw scans). - On VMs, check that the network adapter is in Bridged/NAT mode as intended.
Cannot write to mounted USB/drive
- Check filesystem type and mount options; remount with proper permissions or use
sudo chownwhere appropriate.
Appendix E — 30-day study plan
Daily (30–45 minutes):
- 10 min: terminal reps (navigation, search, permissions).
- 15 min: Bandit or a small lab task.
- 5–10 min: notes — one new command + one insight.
Weekly focus:
- Week 1: filesystem, users/groups, permissions, editors.
- Week 2: processes, services, logs, package management.
- Week 3: networking basics (ip/ss/netstat/nc), transfers (scp/rsync), archives.
- Week 4: Bash scripting fundamentals, small automation for your workflow.
Milestones:
- Day 7: finish Bandit Level 10, write a summary post.
- Day 14: build a personal “cheat sheet” from your notes.
- Day 21: write a 20-line script that saves you time weekly.
- Day 30: publish your setup + lessons learned.
Thanks for reading!
Until next time — Otsumachi!! 💖☄️✨
